カスタマイズできるのカレンダーが必要になったのでざっくり実装。
AngularJSでカレンダーを描画してみる。
合わせて、モーダルウィンドウ上でもカレンダーを表示してみる。
サンプルソースコードはこちら
Mo3g4u/AngularJSCalendarSample
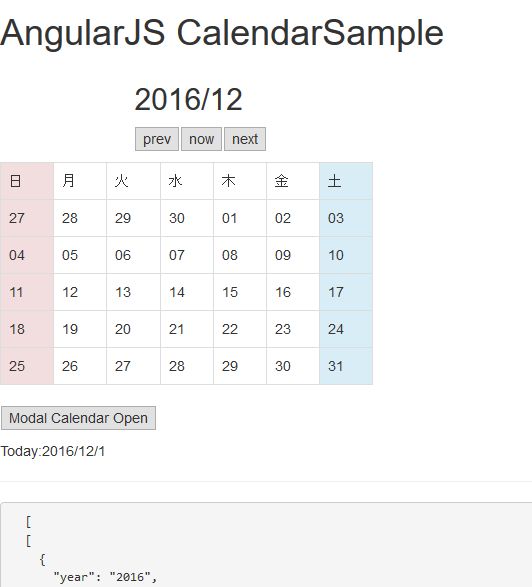
バックエンドに問い合わせて、月のカレンダーを受け取り
描画しているだけ。
バックエンドが返すデータに予約枠数とか、リンクなどを
含めれば予約カレンダーみたいなものができる想定。
天は自ら助くる者を助く
カスタマイズできるのカレンダーが必要になったのでざっくり実装。
AngularJSでカレンダーを描画してみる。
合わせて、モーダルウィンドウ上でもカレンダーを表示してみる。
サンプルソースコードはこちら
Mo3g4u/AngularJSCalendarSample
バックエンドに問い合わせて、月のカレンダーを受け取り
描画しているだけ。
バックエンドが返すデータに予約枠数とか、リンクなどを
含めれば予約カレンダーみたいなものができる想定。
久しぶりに触ってまったく思い出せなかったのでメモ。
$logとかでコンソールログに出すほどじゃないけど、データが
今どうなっているか確認したい場合は以下のようにすれば画面に表示される。
<pre>
  {{data | json}}
</pre>
表示したいデータが「data」で「json」フィルタに通す。
AngularJSでinput要素にrequiredを設定していると半角スペースを入れてもエラーになる。
半角スペースでも入っていたらエラーを出したくない。
調べてみるとこれはどうもng-modelの仕業のようです。
ng-modelはデフォルトでtrimを行うらしく、この動作のせいで
半角スペースを入れただけではエラーになってしまうみたい。
普段の挙動はこれでいいんだろけど、今回は半角スペース入れる
だけでもvalidationを通してしまいたかったので勝手にtrimしない
ように「ng-trim=”false”」を指定。
↓これを・・・
<input ng-model="name" type="text" required />
↓こうしました。
<input ng-model="name" ng-trim="false" type="text" required />
ajaxzip3のGithub移行版へ移行
以前はURLがhttpとhttpsで別だったのでajaxzip3を一本化するために↓のようなことをしてました・・・。
<script src=”//ajaxzip3.googlecode.com/svn/trunk/ajaxzip3/ajaxzip3.js” charset=”UTF-8″></script>
<script type=”text/javascript”>AjaxZip3.JSONDATA=”//ajaxzip3.googlecode.com/svn/trunk/ajaxzip3/zipdata”;</script>
でも最近動かなくなってました。。
なのでついでにGithub版に移行です。
Github移行したのを機にhttpとhttpsの一本化されてて素晴らしい!
<script src="https://ajaxzip3.github.io/ajaxzip3.js" charset="UTF-8"></script>
Google Codeのサービス廃止が決定しているので早めの移行が必要です。
ajaxzip3/ajaxzip3.github.io
https://github.com/ajaxzip3/ajaxzip3.github.io
AngularJsのディレクティブでリストのソート機能を
実装していて困ったのでメモ。
ディレクティブでは実際には「jQuery UI」の「sortable」を
利用していた。
各々のバージョンは以下
jQuery v2.1.3
jQuery UI v1.11.4
AngularJS v1.3.15
実装したコードは以下。
app.directive('mySortable',function(){
    return {
        link:function(scope,el,attrs){
            el.sortable({
                revert: true,
                axis: 'y',
                cancel: "",
                handle: ".sortable-handle"
            });

            el.disableSelection().delegate('input,textarea','click',function(ev){
                ev.target.focus();
            });

            el.on( "sortdeactivate", function( event, ui ) {
                //ソートした時の挙動
                ・・・
            });

        }
    }
})
上記の状態だと「Firefox」と「IE」でソートは出来るのだけどソートする対象内に
あるinputタグにフォーカスが当たるけど全選択(Ctrl+a)とかができないし、
入力値がある場合にもなぜか必ず入力エリアの左側にカーソルが入ってしまう
現象が発生した。
結局以下↓の箇所を
el.disableSelection().delegate('input,textarea','click',function(ev){
    ev.target.focus();
});
「【jQuery】sortable()を設定したタグ内のtextarea, inputタグに入力出来ない」このページの内容通りに以下↓のように変更。
el.bind('click.sortable mousedown.sortable',function(ev){
    ev.target.focus();
});
直った。。
jQuery UI の.disableSelection()がdeprecated(非推奨)になってる件
↑これとかの影響なのかな・・・。
■参考URL
【jQuery】sortable()を設定したタグ内のtextarea, inputタグに入力出来ない
Ticket #4429 (closed bug: notabug) Can’t select text in inputs within sortables
WindowsのVagrant+CentOSで共有フォルダでnpm関係でエラーが出る件[未解決]
Windows7上のVagrantでCentOS6.5を動かしている状態で、
共有フォルダ内で「yo angular」したら
以下のようなエラーが大量に出た。
npm ERR! code EPERM
npm ERR! errno -1
npm ERR!   code: 'EPERM',
npm ERR! Please try running this command again as root/Administrator.
npm ERR! tar.unpack untar error
「/home/vagrant」以下とかだと問題無く動くのにどうやら
共有の「/vagrant」以下で発生する問題っぽい。
まだ解決していないけど、手がかりっぽいサイトをまとめておく。
■Working with npm and symlinks through Vagrant on Windows
http://perrymitchell.net/article/npm-symlinks-through-vagrant-windows/
■running a Vagrant box on Windows fails due to path length issues
https://github.com/npm/npm/wiki/Troubleshooting#upgrading-on-windows
■Vagrant + シェルスクリプトでPHP開発環境をプロビジョニングしてみたメモ
http://k-holy.hatenablog.com/entry/2013/09/05/084237
■provisioning, run: “always” doesn’t
https://groups.google.com/forum/#!topic/vagrant-up/BF_L7-A1iCU
■VirtualBox(Ubuntu)で共有フォルダするときの注意。
http://rubellum.hatenablog.com/entry/20110508/1304835867
■WindowsのVMでnpm install時にモジュールのパスが255文字を超えてしまう場合
http://qiita.com/aooni_kun/items/7d3ded7b1a51886f21dc
■Windowsでのファイルパス長の制限でnpmのパッケージが使えない
http://ja.stackoverflow.com/questions/1990/windows%E3%81%A7%E3%81%AE%E3%83%95%E3%82%A1%E3%82%A4%E3%83%AB%E3%83%91%E3%82%B9%E9%95%B7%E3%81%AE%E5%88%B6%E9%99%90%E3%81%A7npm%E3%81%AE%E3%83%91%E3%83%83%E3%82%B1%E3%83%BC%E3%82%B8%E3%81%8C%E4%BD%BF%E3%81%88%E3%81%AA%E3%81%84
■Node npm windows file paths are too long to install packages
http://stackoverflow.com/questions/26155135/node-npm-windows-file-paths-are-too-long-to-install-packages
う~ん。。共有フォルダで直に作業するのは微妙かも。。
CentOS6環境にyeomanでAngularJSの雛形を作成するまで
AngularJSを開発するときに最初の準備が
面倒なのでyeomanでAngularJSの雛形を簡単
に準備するメモ。
以下の手順ではすんなり入っているようにみえますが、
nodeとかnpmとか久しぶりなのとVagrantのメモリが少なかった
とか色々あってかなり苦戦しました。
最終的に必要だった手順だけ載せます。
インストールはVagrantに作ったCentOS6.5。
ネットワークはpublic_networkでとりあえずDHCP。
インストール時のIPは192.168.1.222。
メモリは2GBに設定。
■nodejs,npmをepelからインストール
# rpm -ivh http://ftp-srv2.kddilabs.jp/Linux/distributions/fedora/epel/6/x86_64/epel-release-6-8.noarch.rpm
# yum -y install nodejs npm --enablerepo=epel
# node --version
v0.10.33
# npm -v
1.3.6
■一応最新版を入れるためにnをいれて安定版を使う
# npm cache clean
# npm install -g n
# n stable
# node -v
v0.10.33
# npm -v
1.3.6
■以前インストールを試したときにエラーが出たのでnpmで一応以下のものも先に入れておく
※あとで面倒なのでグローバルインストール
ここの作業は本来いらないはず・・・?
# npm install -g coffee-script
# npm install -g phantom
# npm install -g grunt-contrib-imagemin
# npm install -g ws
■bower,grunt,gulp,yoをnpmでいれる
※あとで面倒なのでグローバルインストール
# npm install -g bower grunt-cli gulp yo
■AngularJS雛形用のジェネレータをインストール
※あとで面倒なのでグローバルインストール
# npm install -g generator-angular
■yeomanでAngularJSの雛形を作成する
※ここからは一般ユーザでおこなった。
$ mkdir test-angular  <-適当にフォルダを作成
$ cd test-angular/
$ yo angular  <-yoコマンドの実行

     _-----_
    |       |    .--------------------------.
    |--(o)--|    |    Welcome to Yeoman,    |
   `---------´   |   ladies and gentlemen!  |
    ( _´U`_ )    '--------------------------'
    /___A___\
     |  ~  |
   __'.___.'__
 ´   `  |° ´ Y `

Out of the box I include Bootstrap and some AngularJS recommended modules.

? Would you like to use Sass (with Compass)? No  <-Sassは自分は使わないのでNo
? Would you like to include Bootstrap? Yes  <-Bootstrapは使うのでYes
? Which modules would you like to include?  <-表示がよくわからないけど使うものを「◉」使わないものを「◯」に変更
 ◯ angular-animate.js
 ◯ angular-aria.js
 ◉ angular-cookies.js
 ◉ angular-resource.js
 ◯ angular-messages.js
 ◉ angular-route.js
 ◉ angular-sanitize.js
❯◯ angular-touch.js

・・・しばらく待つ・・・

Execution Time (2015-03-18 01:23:47 UTC)
loading tasks    6ms  ▇▇▇▇▇▇▇ 3%
wiredep:app    159ms  ▇▇▇▇▇▇▇▇▇▇▇▇▇▇▇▇▇▇▇▇▇▇▇▇▇▇▇▇▇▇▇▇▇▇▇▇▇▇▇▇▇▇▇▇▇▇▇▇▇▇▇▇▇▇▇▇▇▇▇▇▇▇▇▇▇▇▇▇▇▇▇▇▇▇▇▇▇▇▇▇▇▇▇▇▇▇▇▇▇▇▇▇▇▇▇▇▇▇▇▇▇▇▇▇▇▇▇▇▇▇▇▇▇▇▇▇▇▇▇▇▇▇▇▇▇▇▇▇▇▇▇▇▇▇▇▇▇▇▇▇▇▇▇▇▇▇▇▇▇▇▇▇▇▇▇▇▇▇▇▇▇▇▇▇▇▇▇▇▇▇▇▇▇▇▇▇▇▇▇▇▇▇ 89%
wiredep:test    12ms  ▇▇▇▇▇▇▇▇▇▇▇▇▇▇ 7%
Total 179ms

$ ll
total 76
drwxrwxr-x  6 vagrant vagrant  4096 Mar 18 01:21 ./
drwxrwxr-x  3 vagrant vagrant  4096 Mar 18 01:19 ../
drwxrwxr-x  6 vagrant vagrant  4096 Mar 18 01:20 app/
drwxrwxr-x 10 vagrant vagrant  4096 Mar 18 01:21 bower_components/
-rw-rw-r--  1 vagrant vagrant   371 Mar 18 01:20 bower.json
-rw-rw-r--  1 vagrant vagrant    38 Mar 18 01:20 .bowerrc
-rw-r--r--  1 vagrant vagrant   415 Feb 10 19:07 .editorconfig
-rw-r--r--  1 vagrant vagrant    11 Feb 10 19:07 .gitattributes
-rw-r--r--  1 vagrant vagrant    52 Feb 10 19:07 .gitignore
-rw-rw-r--  1 vagrant vagrant 10575 Mar 18 01:20 Gruntfile.js
-rw-r--r--  1 vagrant vagrant   376 Feb 10 19:07 .jshintrc
drwxrwxr-x 30 vagrant vagrant  4096 Mar 18 01:21 node_modules/
-rw-rw-r--  1 vagrant vagrant  1154 Mar 18 01:21 package.json
-rw-rw-r--  1 vagrant vagrant   282 Mar 18 01:20 README.md
drwxrwxr-x  3 vagrant vagrant  4096 Mar 18 01:20 test/
-rw-r--r--  1 vagrant vagrant   110 Feb  2 19:59 .travis.yml
-rw-r--r--  1 vagrant vagrant     3 Feb 10 19:07 .yo-rc.json
雛形が完成
■Gruntfile.jsの編集
静的サーバを立ち上げてブラウザから確認できるようにhostnameを変更しておく。
今回の場合は192.168.1.222にした。
・・・・
    // The actual grunt server settings
    connect: {
      options: {
        port: 9000,
        // Change this to '0.0.0.0' to access the server from outside.
        hostname: '192.168.1.222',
        livereload: 35729
      },
・・・・
■Gruntサーバ起動
$ grunt serve
Running "serve" task

Running "clean:server" (clean) task
>> 1 path cleaned.

Running "wiredep:app" (wiredep) task

Running "wiredep:test" (wiredep) task

Running "concurrent:server" (concurrent) task

    Running "copy:styles" (copy) task
    Copied 1 file

    Done, without errors.

    Execution Time (2015-03-18 01:39:59 UTC)
    loading tasks   5ms  ▇▇▇▇▇▇▇▇▇▇▇ 23%
    copy:styles    16ms  ▇▇▇▇▇▇▇▇▇▇▇▇▇▇▇▇▇▇▇▇▇▇▇▇▇▇▇▇▇▇▇▇▇▇▇ 73%
    Total 22ms

Running "autoprefixer:server" (autoprefixer) task
File .tmp/styles/main.css created.

Running "connect:livereload" (connect) task
Started connect web server on http://192.168.1.222:9000

Running "watch" task
Waiting...
■ブラウザで確認

■リリース用ファイル作製
$ grunt build
・・・・
$ ll
total 84
drwxrwxr-x  8 vagrant vagrant  4096 Mar 18 01:42 ./
drwxrwxr-x  3 vagrant vagrant  4096 Mar 18 01:19 ../
drwxrwxr-x  6 vagrant vagrant  4096 Mar 18 01:20 app/
drwxrwxr-x 10 vagrant vagrant  4096 Mar 18 01:21 bower_components/
-rw-rw-r--  1 vagrant vagrant   371 Mar 18 01:20 bower.json
-rw-rw-r--  1 vagrant vagrant    38 Mar 18 01:20 .bowerrc
drwxrwxr-x  7 vagrant vagrant  4096 Mar 18 01:43 dist/  <-distが作られる
-rw-r--r--  1 vagrant vagrant   415 Feb 10 19:07 .editorconfig
-rw-r--r--  1 vagrant vagrant    11 Feb 10 19:07 .gitattributes
-rw-r--r--  1 vagrant vagrant    52 Feb 10 19:07 .gitignore
-rw-rw-r--  1 vagrant vagrant 10579 Mar 18 01:39 Gruntfile.js
-rw-r--r--  1 vagrant vagrant   376 Feb 10 19:07 .jshintrc
drwxrwxr-x 30 vagrant vagrant  4096 Mar 18 01:21 node_modules/
-rw-rw-r--  1 vagrant vagrant  1154 Mar 18 01:21 package.json
-rw-rw-r--  1 vagrant vagrant   282 Mar 18 01:20 README.md
drwxrwxr-x  3 vagrant vagrant  4096 Mar 18 01:20 test/
drwxrwxr-x  4 vagrant vagrant  4096 Mar 18 01:42 .tmp/
-rw-r--r--  1 vagrant vagrant   110 Feb  2 19:59 .travis.yml
-rw-r--r--  1 vagrant vagrant     3 Feb 10 19:07 .yo-rc.json
これで準備が整ったのであとはapp以下で開発をおこなっていく。
■参考URL
・Yeoman を使って Webアプリの雛形を作ってみる
http://akiyoko.hatenablog.jp/entry/2014/07/31/024528
・yeomanを使ったAngularJSプロジェクトの始め方 2014年版
http://blog.kinzal.net/post/104245981055/yeoman-angularjs-2014
・エンカフェ
https://www.engcafe.tv/?tag=yeoman
・yeoman+grunt+bowerでangularjs+bootstrap+sass環境構築
http://ryutamaki.hatenablog.com/entry/2014/05/26/003744
・Nodeの複数バージョン管理のお供にnをどうぞ
http://dekokun.github.io/posts/2014-01-01.html
■個人メモ
front_dev
AngularJSでng-repeartを使って動的に入力フォームを作成した時に
requiredなどのバリデーションが上手く動かなかったのでそのときの対処方法。
あと、plunker使ってみました。
■通常のエラーチェックの例
http://plnkr.co/edit/AXxoyf2ZU5ti7WQDXW70?p=preview
問題が起きたケースはinputタグなどをng-repeartを使って
複数作成した場合にでした。
たとえば以下のような記述です。
※実際にはモーダル画面の中でinputタグの動的追加みたいなことをしてました。
<form name="mainForm">
	<div ng-repeat="title in titles">
		<input type="text "name="title{{ $index }}" ng-model="titles[$index]" required />
		<span ng-show="mainForm.title{{ $index }}.$error.required">Title required!</span>
	</div>
</form>
ただ自分の場合はこれだと値を空にしてもエラーメッセージが表示されませんでした。
ググってみると
Dynamic validation and name in a form with AngularJS
http://stackoverflow.com/questions/14378401/dynamic-validation-and-name-in-a-form-with-angularjs
上記のようなページが見つかり、上記ページ中の↓のように「ng-form」を
利用することで正常にエラーが表示されるようになりました。
formタグの入れ子の利用ということかな?
これでわざわざnameを変えなくてもバリデーションがかけられます。
<form name="outerForm">
<div ng-repeat="item in items">
   <ng-form name="innerForm">
      <input type="text" name="foo" ng-model="item.foo" />
      <span ng-show="innerForm.foo.$error.required">required</span>
   </ng-form>
</div>
<input type="submit" ng-disabled="outerForm.$invalid" />
</form>
formディレクティブの入れ子のエイリアスです。 HTMLはフォーム要素の入れ子を許可していません。 例えば、コントロールのサブグループのみの検証が必要なケースで、入れ子のフォームは便利です。
■ng-repeatを使ったフォームのエラーチェック例
http://plnkr.co/edit/1cccXO6UmCi4K6it78Zj?p=preview
AngularJS読書メモ
娘に歯が生え始めました!
ディレクティブとかサービスとかどこに何を書けばいいのかよくわかってないので、
本で学習。
コントローラはスコープをセットアップする関数。
コントローラで$scopeのメソッドを定義する際に複雑な
ロジックを記述してしまうのではなく、プレゼンテーション
ロジックはフィルターやディレクティブに、ビジネスロジック
はサービスに分離して記述し、コントローラはあくまでも
スコープのセットアップ処理だけに徹するのがいい。
プレゼンテーションロジックを実装する:ディレクティブ、フィルター
ビジネスロジックや共通処理を実装する:サービス
これらを繋ぎ合わせる:コントローラ、スコープ
その他:DI、モジュール管理機能
読んだからといって出来てるわけではないです。。
AngularJSでDragAndDropとSortableとModalを組み合わせてみた
あけましておめでとうございます。2015年もぼちぼちブログにメモしていきます。
前回に引き続き、AngularJS。
リストの並べ替えとドラッグ&ドロップでの
リスト要素追加、リスト要素の削除とリスト要素の内容変更を
モーダルウィンドウで行うを組み合わせてみました。
あと一応タッチデバイスでも動くように「jQuery UI Touch Punch」
も読み込んでます。
まだAngularJSがよくわかってないので書き方がおかしい
かもしれませんが晒してみます。
わかった範囲でコメントも記載しています。
おかしなところがあったら指摘をお願いします。。
■index.html
<!DOCTYPE html>
<html ng-app="myapp">
<head>
<meta http-equiv="Content-Type" content="text/html; charset=UTF-8" />
<title>AngularJs drag and drop and sortable sample</title>
<link rel="stylesheet" type="text/css" href="https://cdnjs.cloudflare.com/ajax/libs/twitter-bootstrap/3.1.0/css/bootstrap.min.css"/>
<script src="http://ajax.googleapis.com/ajax/libs/jquery/2.0.0/jquery.min.js"></script>
<script src="http://ajax.googleapis.com/ajax/libs/jqueryui/1.10.2/jquery-ui.min.js"></script>
<script src="jquery.ui.touch-punch.min.js"></script>
<script src="http://ajax.googleapis.com/ajax/libs/angularjs/1.1.3/angular.min.js"></script>
<script src="http://cdnjs.cloudflare.com/ajax/libs/angular-ui/0.4.0/angular-ui.min.js"></script>
<script src="https://cdnjs.cloudflare.com/ajax/libs/angular-ui-bootstrap/0.10.0/ui-bootstrap-tpls.min.js"></script>
<script src="app.js"></script>
</head>
<body ng-controller="myCtrl">
<div class="container" style="margin-top:20px;">
<h1>AngularJs drag and drop and sortable sample.</h1>
<div class="row">
<div class="col-md-4">
<div class="panel panel-default">
<div class="panel-heading">
drag要素
</div>
<div class="list-group" ng-model="items">
<div my-draggable="#sortable" class="list-group-item" ng-repeat="item in items">{{item.title}}</div>
</div>
</div>
</div>
<div class="col-md-8">
<div class="panel panel-default">
<div class="panel-heading">
sortable要素
</div>
<div class="list-group" ng-model="blocks" my-sortable id="sortable">
<div class="list-group-item" ng-repeat="block in blocks">
<div>■{{block.title}}</div>
<button class="btn btn-primary sortable-handle" >並び替え</button>
<button class="btn btn-success" my-modal-edit>編集</button>
<button class="btn btn-danger" my-modal-delete>削除</button>
</div>
</div>
</div>
</div>
</div>
<!-- デバッグ用エリア -->
<div class="row">
<div class="col-md-4">
<pre>
{{items | json }}
</pre>
</div>
<div class="col-md-8">
<pre>
{{blocks | json }}
</pre>
</div>
</div>
</div>
<!-- Modal for edit -->
<script type="text/ng-template" id="T_editForm">
<div class="modal-header">
<button type="button" class="close" ng-click="$dismiss()">×</button>
<h3>要素編集モーダル</h3>
</div>
<div class="modal-body">
<form role="form">
<div class="form-group">
<label>title</label>
<input ng-model="editData.title" type="text" class="form-control" placeholder="タイトル" />
</div>
</form>
<div ng-show="error">
{{error}}
</div>
</div>
<div class="modal-footer">
<button type="button" class="btn btn-success" my-update>編集</button>
</div>
</script><!-- Modal for edit-->
<!-- Modal for delete -->
<script type="text/ng-template" id="T_deleteForm">
<div class="modal-header">
<button type="button" class="close" ng-click="$dismiss()">×</button>
<h3>要素削除モーダル</h3>
</div>
<div class="modal-body">
<div>
タイトル:{{block.title}}を削除します。
</div>
</div>
<div class="modal-footer">
<button type="button" class="btn btn-success" ng-click="$close()">削除する</button>
</div>
</script><!-- Modal for delete-->
</body>
</html>
■app.js
var app = angular.module('myapp', ['ui.bootstrap']);

app.controller('myCtrl', function($scope, $modal) {
    // drag元データ
    $scope.items = [
    {'title' : 'テキストA'},
    {'title' : 'テキストB'},
    {'title' : 'テキストC'},
    {'title' : 'テキストD'},
    {'title' : 'テキストE'},
    {'title' : 'テキストF'},
    {'title' : 'テキストG'},
    {'title' : 'テキストH'},
    {'title' : 'テキストI'},
    ];

    // sortable対象データ -> 初回は本来はサーバから取得する
    $scope.blocks = [
    {'title' : 'デフォルトA'},
    {'title' : 'デフォルトB'},
    {'title' : 'デフォルトC'},
    {'title' : 'デフォルトD'},
    {'title' : 'デフォルトE'},
    {'title' : 'デフォルトF'},
    {'title' : 'デフォルトG'},
    {'title' : 'デフォルトH'},
    {'title' : 'デフォルトI'},
    {'title' : 'デフォルトJ'},
    ];

    // 編修のモーダルインスタンスを保持する用
    $scope.editModalInstance = null;

    // sort処理
    // $on -> $emitや$broadcastで送信したイベントを受け取るメソッド
    $scope.$on('my-sorted',function(event,val){
      $scope.blocks.splice(val.to, 0, $scope.blocks.splice(val.from, 1)[0]);
    })

    // drag処理
    $scope.$on('my-created',function(event,val){
      $scope.blocks.splice(val.to, 0,{title:'#'+($scope.blocks.length+1)+': '+val.title});
    })

    // delete処理
    $scope.$on('my-delete',function(event,val){
      $scope.blocks.splice(val, 1);
    })

    // blockの更新
    $scope.$on('my-update',function(event,val){
      $scope.blocks.splice(val.index, 1, val.data); // 差し替え
    })

  });

// sortableのディレクティブ
app.directive('mySortable',function(){
  return {
    // scope -> scope,
    // el -> ディレクティブが適用された箇所の要素,
    // attrs -> ディレクティブが適用された要素の属性
    link:function(scope,el,attrs){
      // jQuery UI sortableのオプション
      // http://www.jqref.net/ui/interactions/sortable.php
      el.sortable({
        revert: true,
        axis: 'y',
        cancel: "", // 指定しない -> 参考: http://kamegu.hateblo.jp/entry/jquery-ui/sortable-handle
        handle: ".sortable-handle"
      });
      el.disableSelection();

      // deactivate は、アイテムがドラッグ終了した時に呼び出されます。
      // event - イベントオブジェクト
      // ui - ui オブジェクト
      //    item - ドラッグ開始したアイテムの jQuery オブジェクト
      el.on( "sortdeactivate", function( event, ui ) {
        // scope -> 要素に結び付いている$scopeを取得する dragされてきた場合は$indexはundefined
        var from = angular.element(ui.item).scope().$index;
        //console.log('from -> ' + from);

        // jQueryオブジェクト内で、引数で指定されたエレメントのインデックス番号を返す。インデックスは、ゼロから始まる連番。
        // もし渡されたエレメントがjQueryオブジェクト内に存在しない場合、戻り値には-1が返る。
        var to = el.children().index(ui.item);
        //console.log('to -> ' + to);

        if(to>=0){
          // $apply -> AngularJS管理外のイベントハンドラの中で$applyメソッドを実行すると、強制的に実行できる。
          scope.$apply(function(){
            if(from>=0){
              // fromがあるからソート処理  $emit -> 派生元のスコープに対してイベントを送信するメソッド
              scope.$emit('my-sorted', {from:from,to:to}); // イベント呼び出し
            }else{
              // fromが無いから追加処理
              scope.$emit('my-created', {to:to, title:ui.item.text()}); // イベント呼び出し
              ui.item.remove();
            }
          })
        }
      } );
    }
  }
})

// draggableのディレクティブ
app.directive('myDraggable',function(){
  return {
    link:function(scope,el,attrs){
      // jQuery UI draggableのオプション
      // http://www.jqref.net/ui/interactions/draggable.php
      el.draggable({
        connectToSortable: attrs.myDraggable, // connectToSortable を指定すると、sortable にコネクト(項目を追加)することができます。
        helper: "clone",
        revert: "invalid"
    });
    el.disableSelection(); // jQuery UI マッチした要素集合のテキスト選択を無効にします。
    }
  }
})

// 削除のモーダルを開くディレクティブ
app.directive('myModalDelete', function($modal){
  return {
    scope: false, // falseを指定すると、そのディレクティブを利用している箇所のスコープがディレクティブのスコープとして扱える
    link:function(scope,el,attr){
      el.on("click", function( event ){
        scope.$apply(function(){
          var modalInstance = $modal.open({
            templateUrl: "T_deleteForm",
            scope: scope // 呼び出されたときのスコープをそのまま渡しているのでテンプレート側でblockが使える
          });

          // modalInstanceからのコールバックを受ける
          modalInstance.result.then(function() {
            //console.log("モーダル側でcloseが呼ばれた!");
            scope.$emit('my-delete', scope.$index);
          }, function() {
            //console.log("モーダル側でdismissが呼ばれた!");
          });
        })
      });
    }
  }
})

// 編集のモーダルを開くディレクティブ
app.directive('myModalEdit', function($modal){
  return {
    scope: false, // falseを指定すると、そのディレクティブを利用している箇所のスコープがディレクティブのスコープとして扱える
    link:function(scope,el,attr){
      el.on("click", function( event ){
        scope.$apply(function(){
          scope.editData = angular.copy(scope.block); // リアルタイムに編集してしまわないようにコピーする

          // 外部の操作で閉じられるようにモーダルのインスタンスを親スコープに保存しておく
          scope.$parent.editModalInstance = $modal.open({
            templateUrl: "T_editForm",
            scope: scope // 呼び出されたときのスコープをそのまま渡しているのでテンプレート側でblockが使える
          });

          // modalInstanceからのコールバックを受ける
          scope.editModalInstance.result.then(function() {
            //console.log("モーダル側でcloseが呼ばれた!");
          }, function() {
            //console.log("モーダル側でdismissが呼ばれた!");
          });
        })
      });
    }
  }
})

// 編集でデータの更新
app.directive('myUpdate', function(){
  return {
    scope: false, // falseを指定すると、そのディレクティブを利用している箇所のスコープがディレクティブのスコープとして扱える
    link:function(scope,el,attr){
      el.on("click", function( event ){
        scope.$apply(function(){

          // エラーチェック -> サービスに切り出すほうがいいのかも。
          if(!scope.editData.title){
            scope.error = 'タイトルは必須です。';
            return;
          }

          // データの更新
          scope.$emit('my-update', {index:scope.$index, data:scope.editData});
          scope.editData = null; // 念の為消しておく

          // モーダル閉じる
          scope.editModalInstance.close();
        })
      });
    }
  }
})
参考サイト
■Drag object into sortable list – AngularJS
http://stackoverflow.com/questions/18835619/drag-object-into-sortable-list-angularjs
⇒回答者のデモ
http://plnkr.co/edit/aSOlqR0UwBOXgpQSFKOH?p=preview
■Angular.js入門 (5)ディレクティブ その2
http://qiita.com/_rdtr/items/590ccb7be16dc8ed9be3
■AngularJS 製アプリで jQuery を使いたい
http://dev.classmethod.jp/client-side/javascript/angularjsandjquery/
■積極的に利用したい AngularJS グローバル API
http://dev.classmethod.jp/client-side/javascript/angularjsglobalapis/
■AngularJSではじめるHTML5開発 – Part8 モーダルダイアログによる新規レコード作成フォーム
http://www.nkjmkzk.net/?p=5401
■AngularJSでBootstrapのModalを出す方法メモ
http://otiai10.hatenablog.com/entry/2014/10/30/000537
■AngularJSで HTML5的なアラートウィンドウを表示する
http://www.walbrix.com/jp/blog/2014-01-angularjs-simplemodal.html
■jQuery UI Touch Punch
https://github.com/furf/jquery-ui-touch-punch
■AngularJSで、動的に入力項目数を設定する
http://diaryruru.blog.fc2.com/blog-entry-64.html